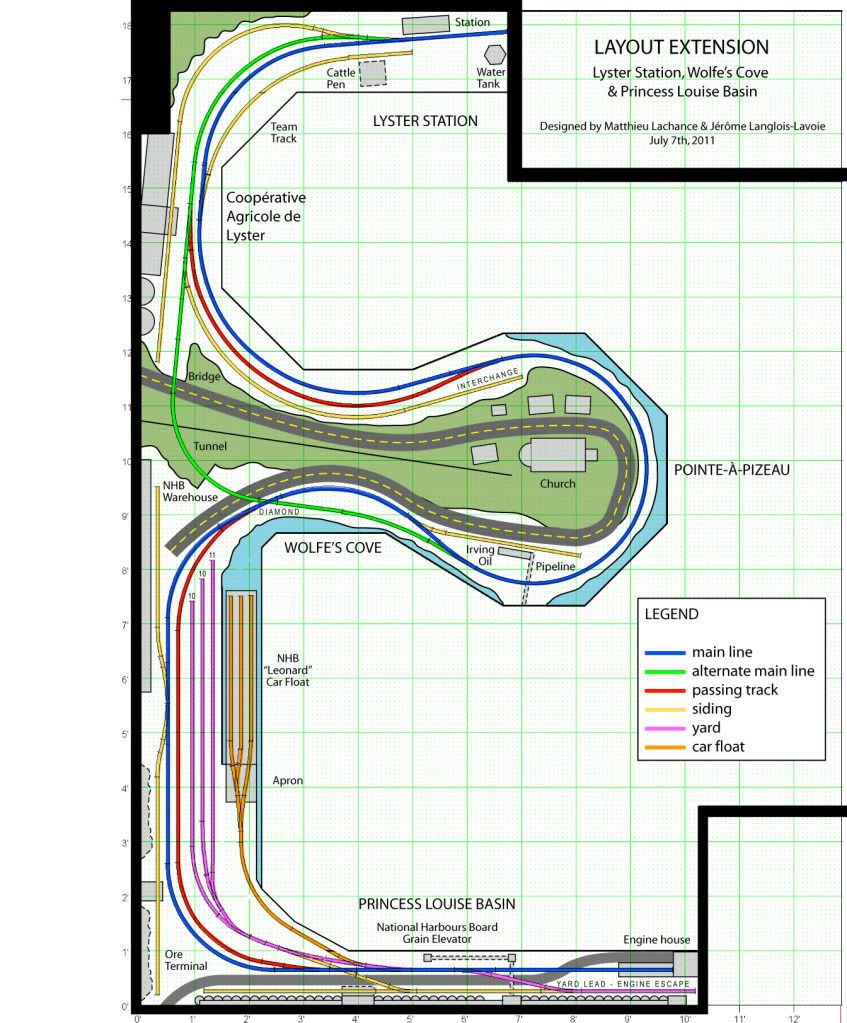
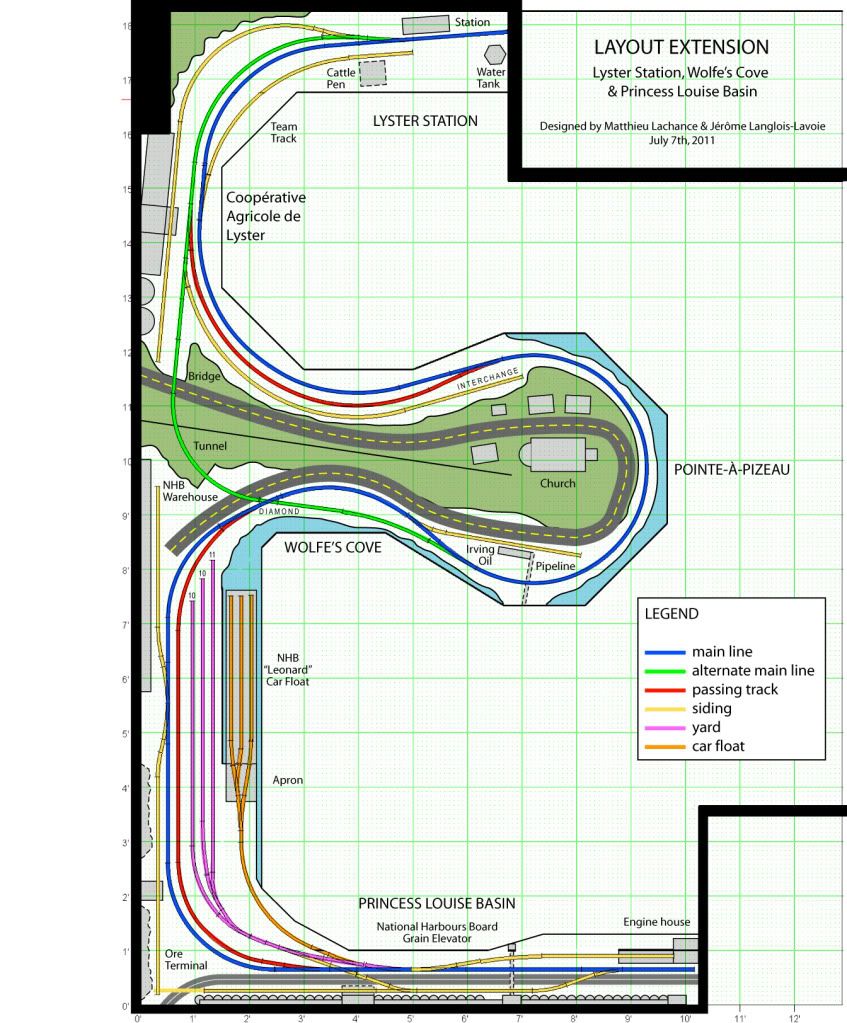
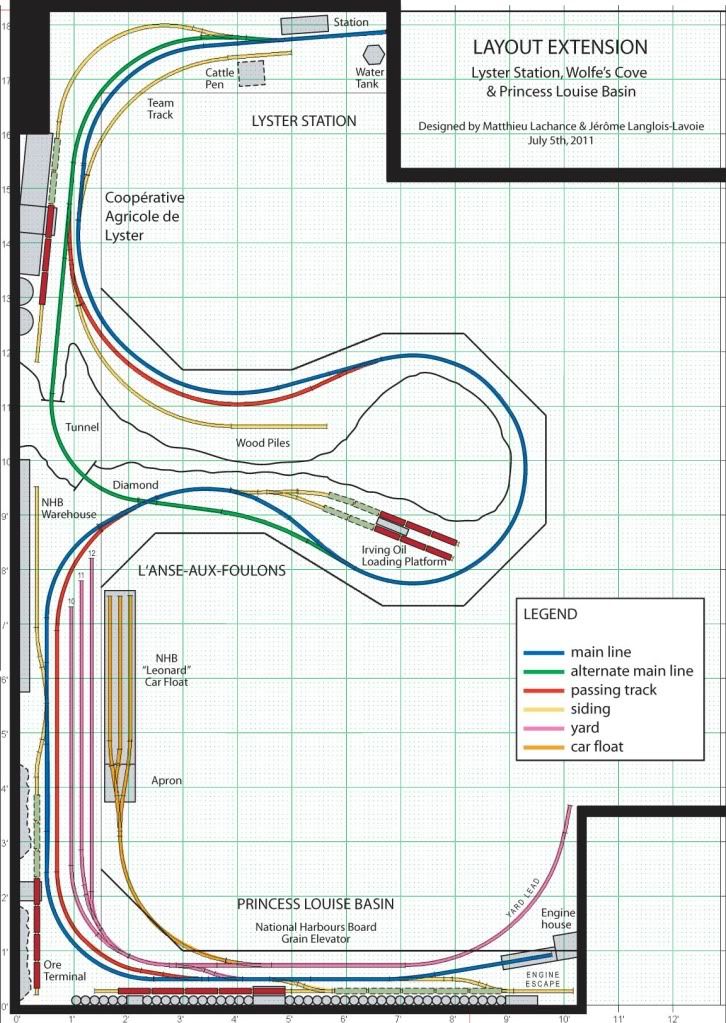
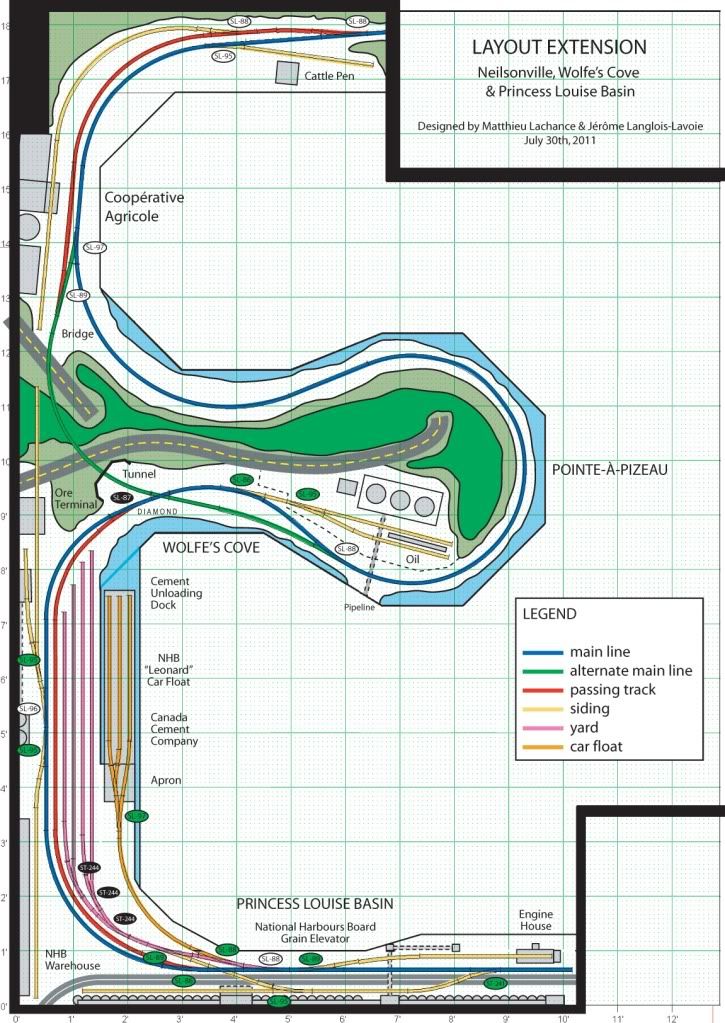
Saturday, July 30, 2011

CPR Tunnel - South Portal

Thursday, we decided to use only PECO turnouts on the new part. They work fine in manual mode and doesn't need unsightly switch machine.

Layout plan updated


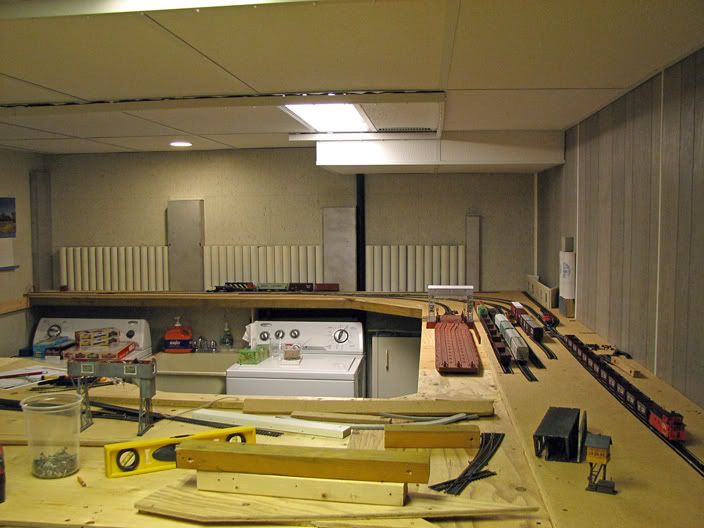
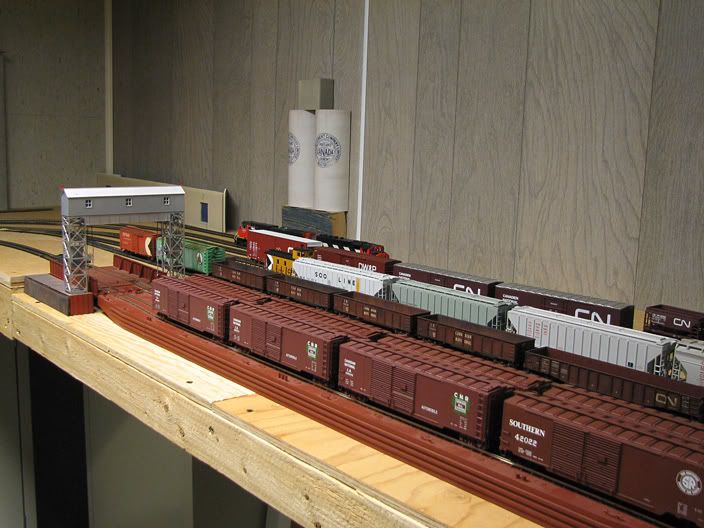
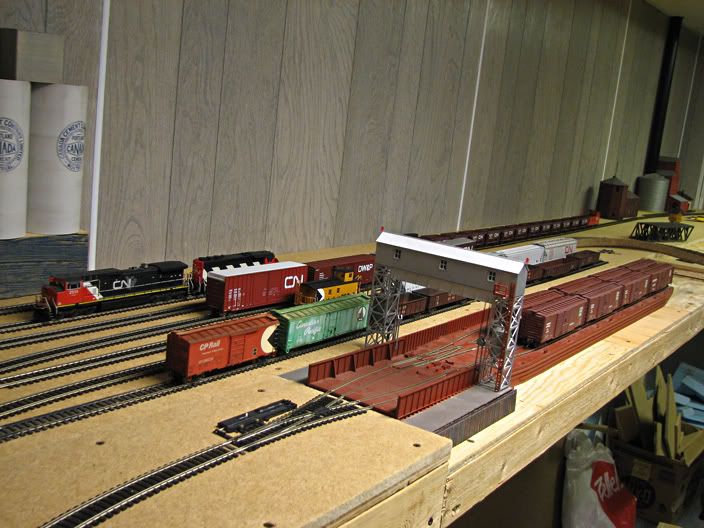
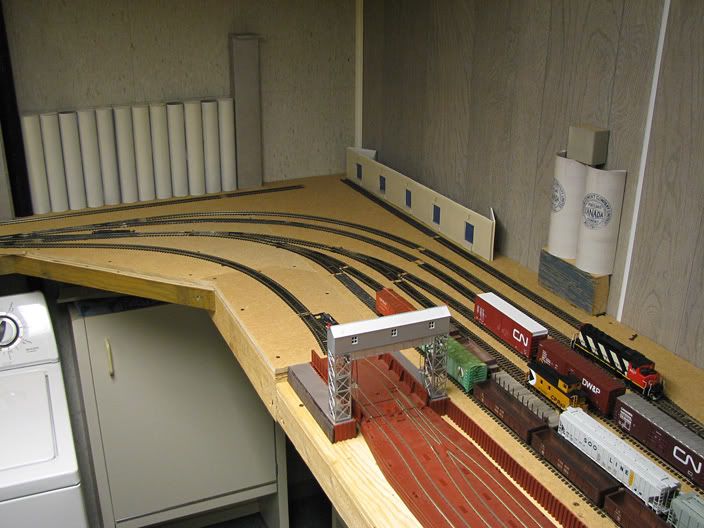
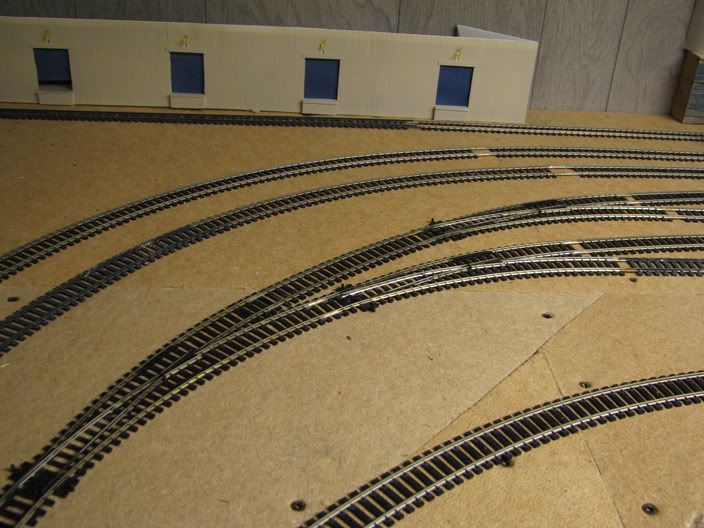
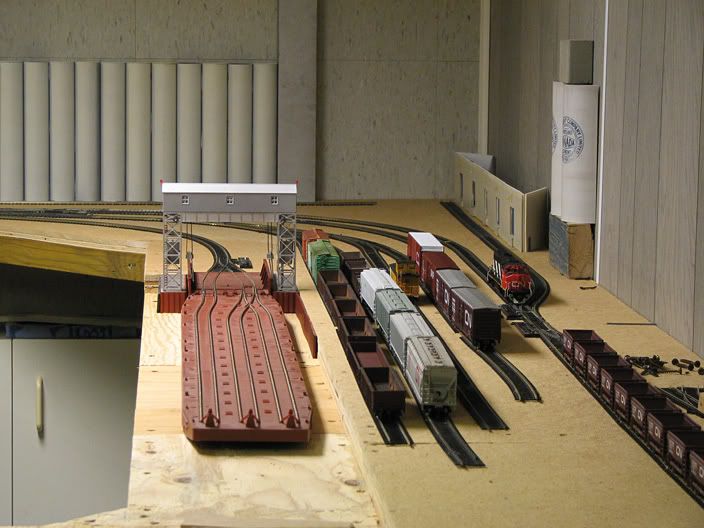
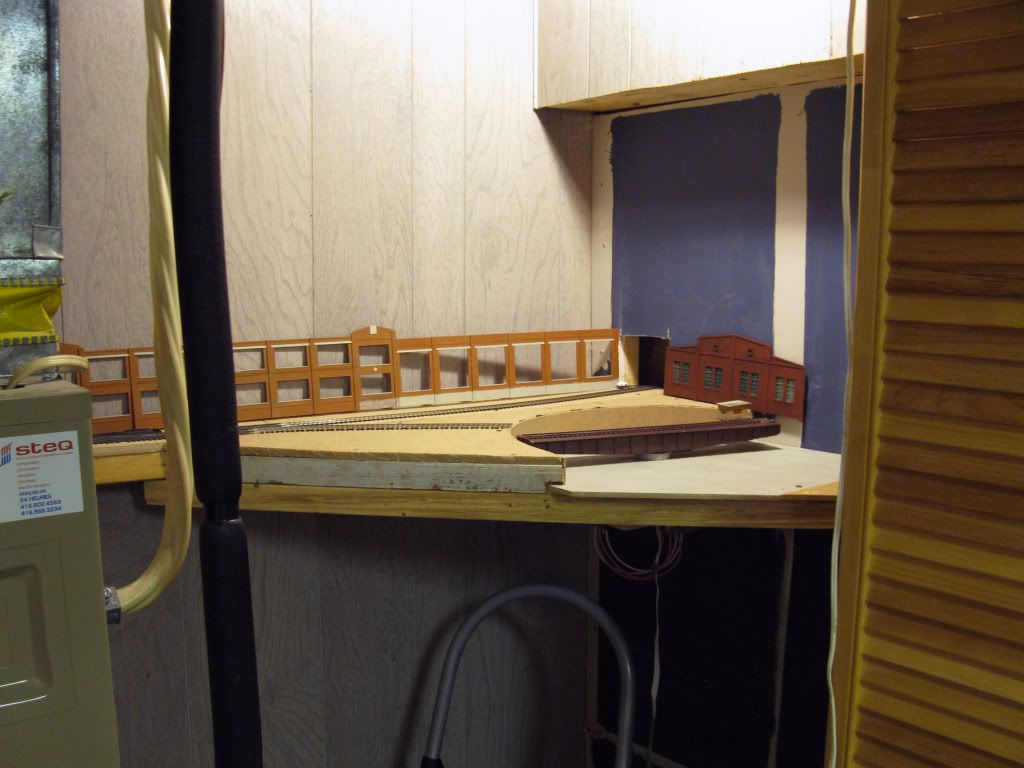
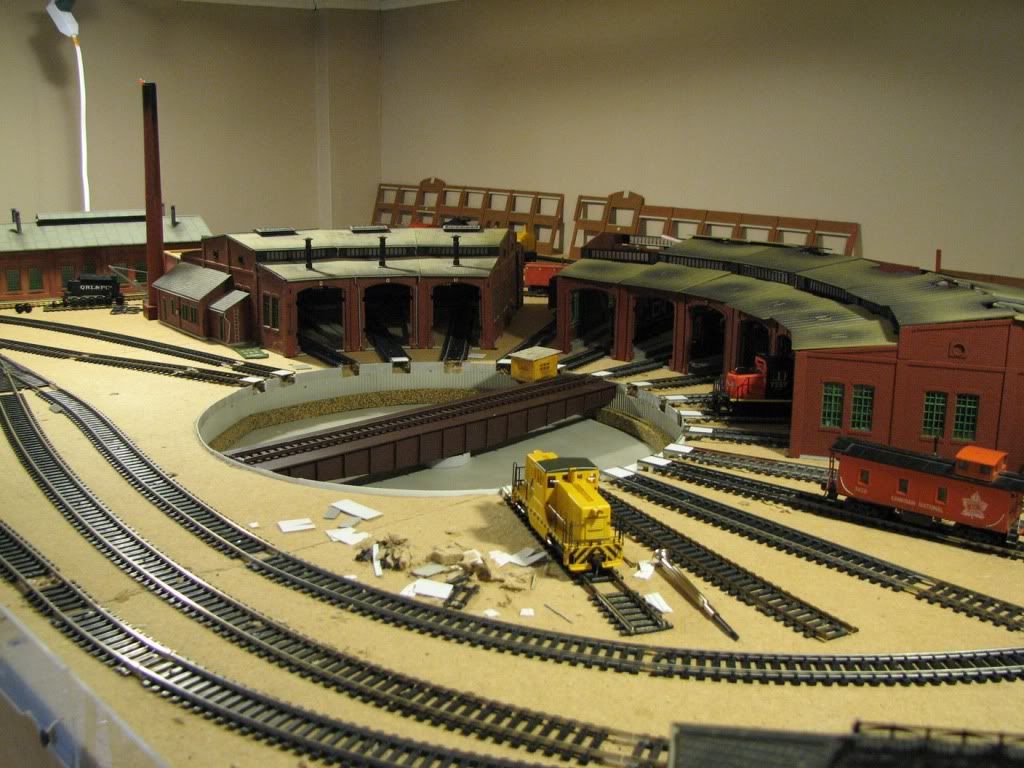
Friday, we made the decision to replace all turnouts on the new layout extension with PECO. I had to redraw the track plan to make sure everything you fit. Doing this enabled me to modify some sidings, particularly the Ore Terminal and the Oil Loading Docks. Jérôme switched some cars yesterday and built mock up sidings. It was clear we had to redesign these area to fit our needs.

Wolfe's Cove CPR Tunnel - South Portal

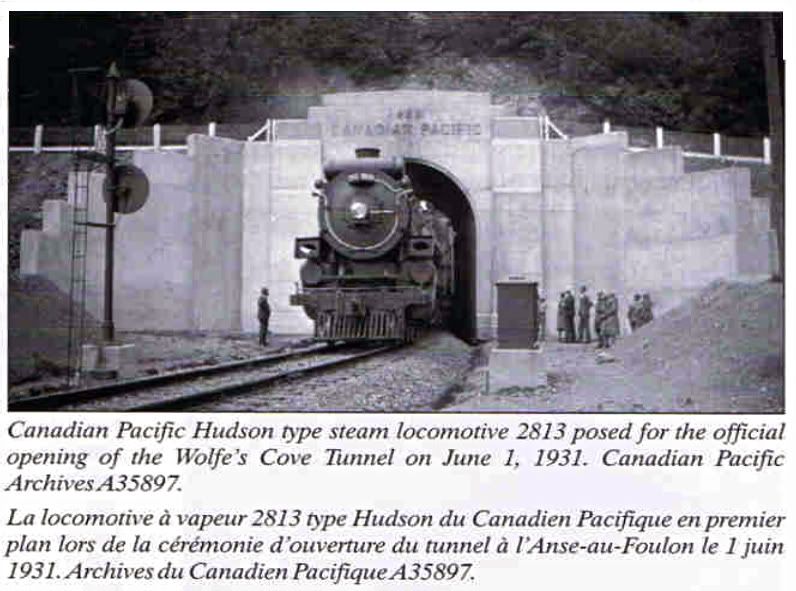
Portal in 1930. The road was above the entrance.


Last Friday morning, we decided to railfan at L'Anse-aux-Foulons to get first hand data and watch some operation there. We also measured the south tunnel portal which turned out to be in major dilapidation. This fine Art Deco portal was built in 1930 to reach new CPR Steamships Terminal. For this reason, it received a special architectural treatment the north portal cruelly lacks. For more information about this forgotten engineering work, you can read this bilingual brochure written by Denis Fortier.

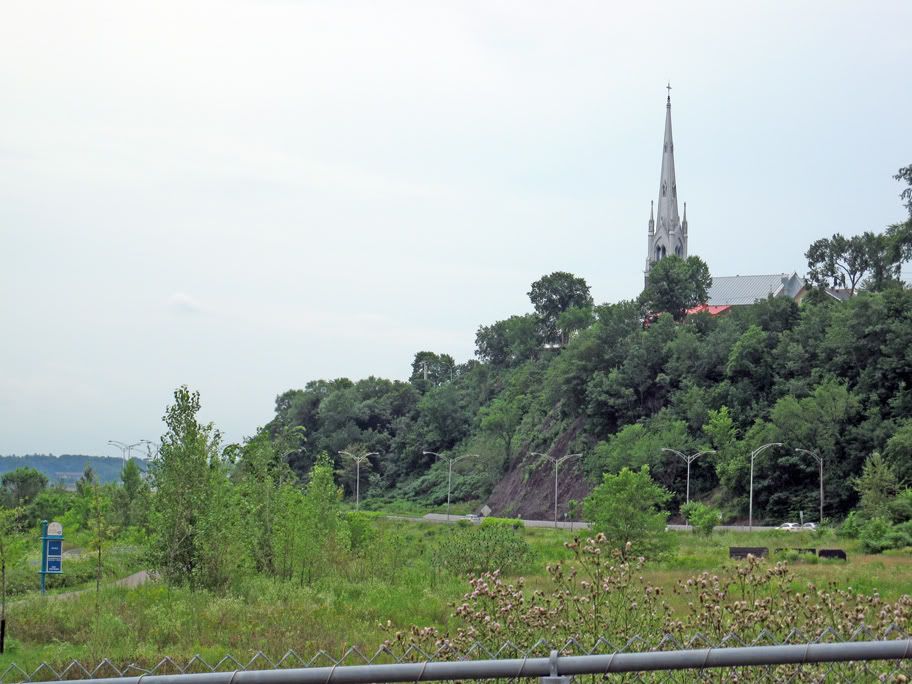
Pointe-à-Pizeau's purple limestone cliffs. The track is lost in the bush!


We also took advantage of this little trip to gather few rock samples from the cliff. Pointe-à-Pizeau is an important scenery feature on our layout peninsula with the landmark gothic church.

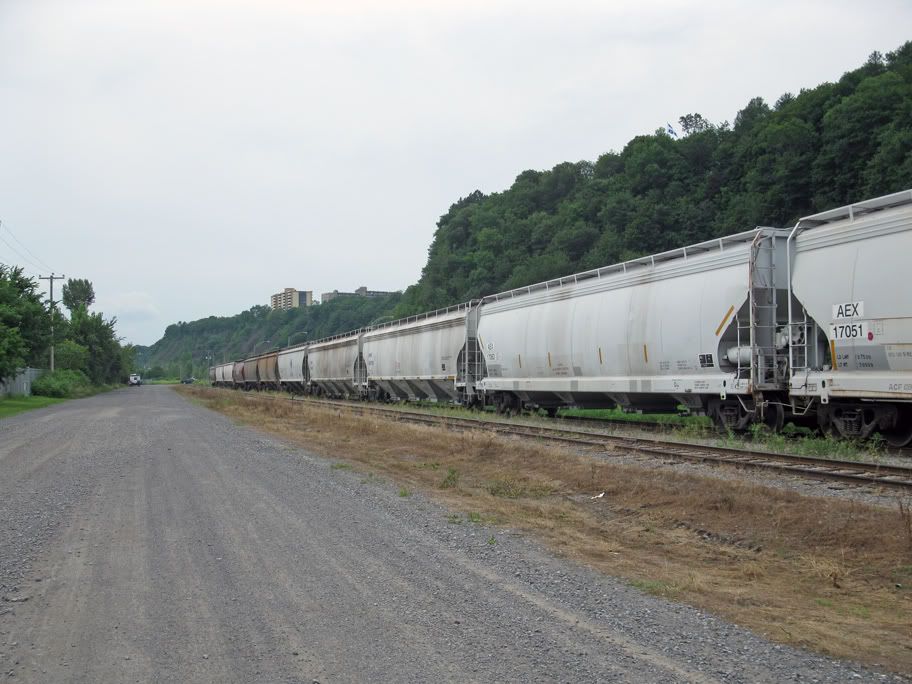
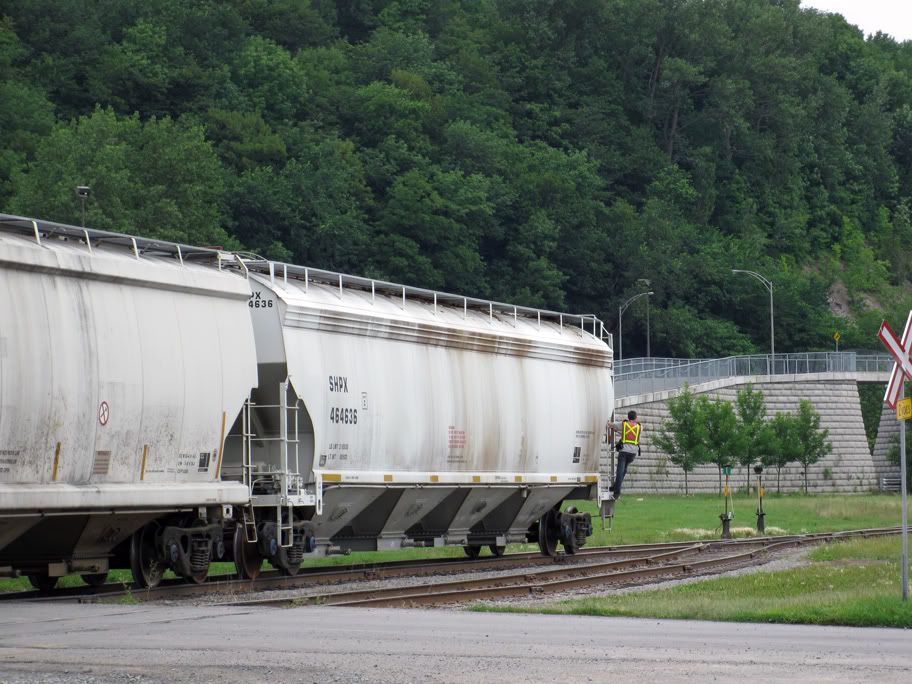
L'Anse-aux-Foulons, west side. In the background is Pointe-à-Pizeau


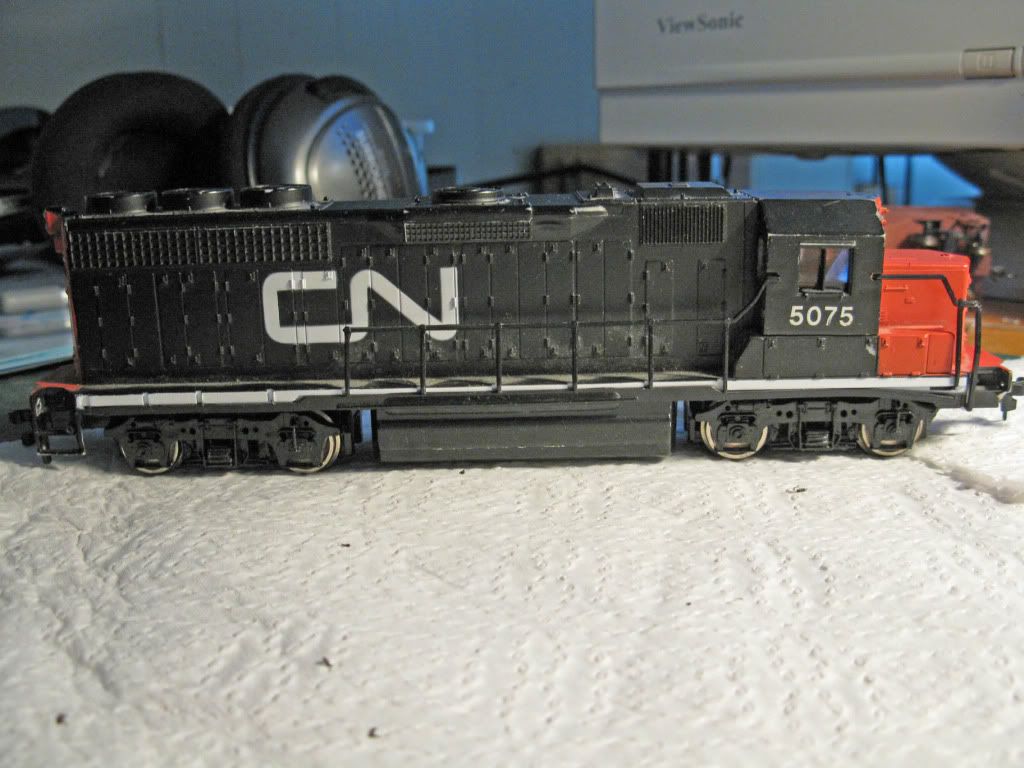
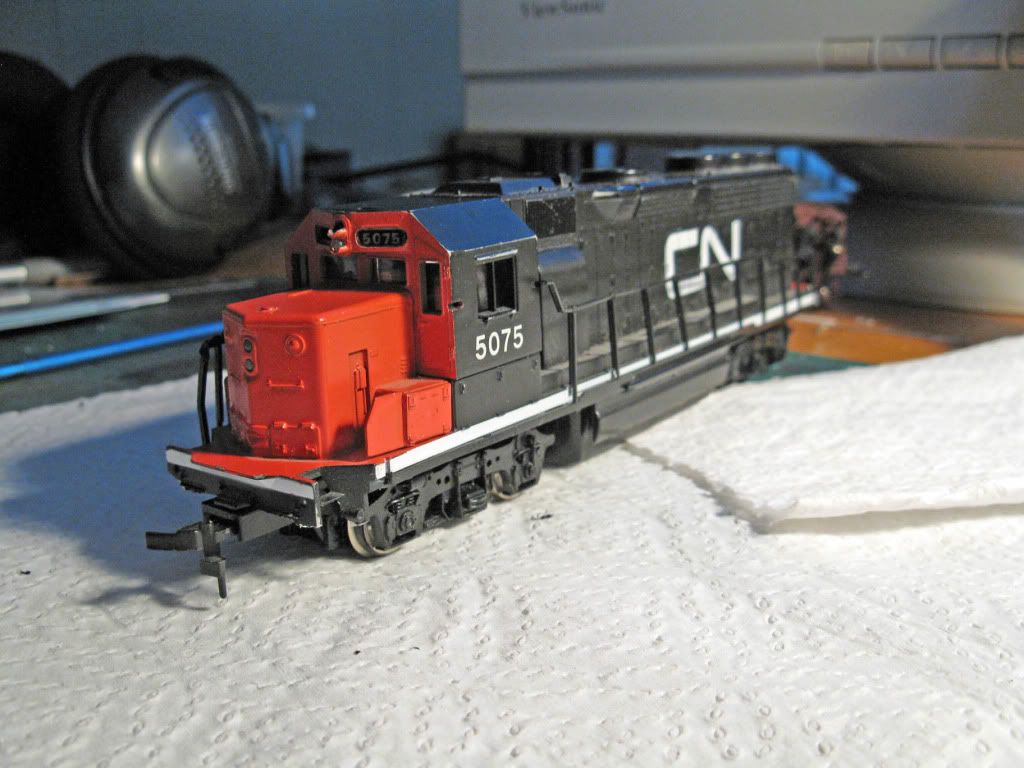
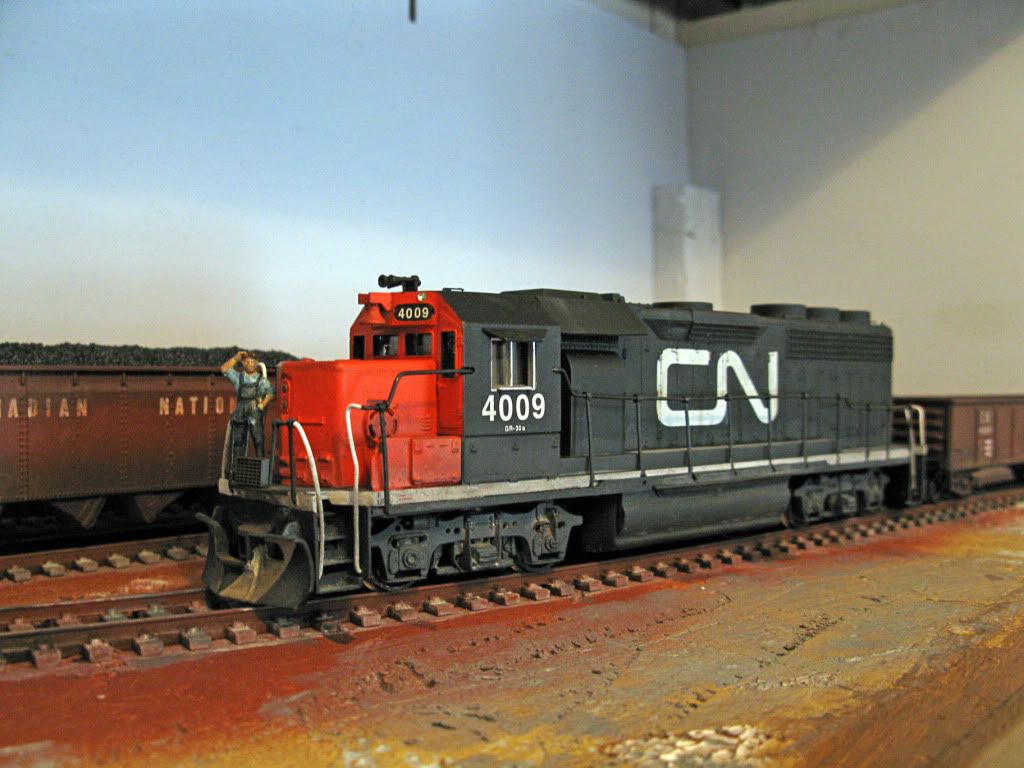
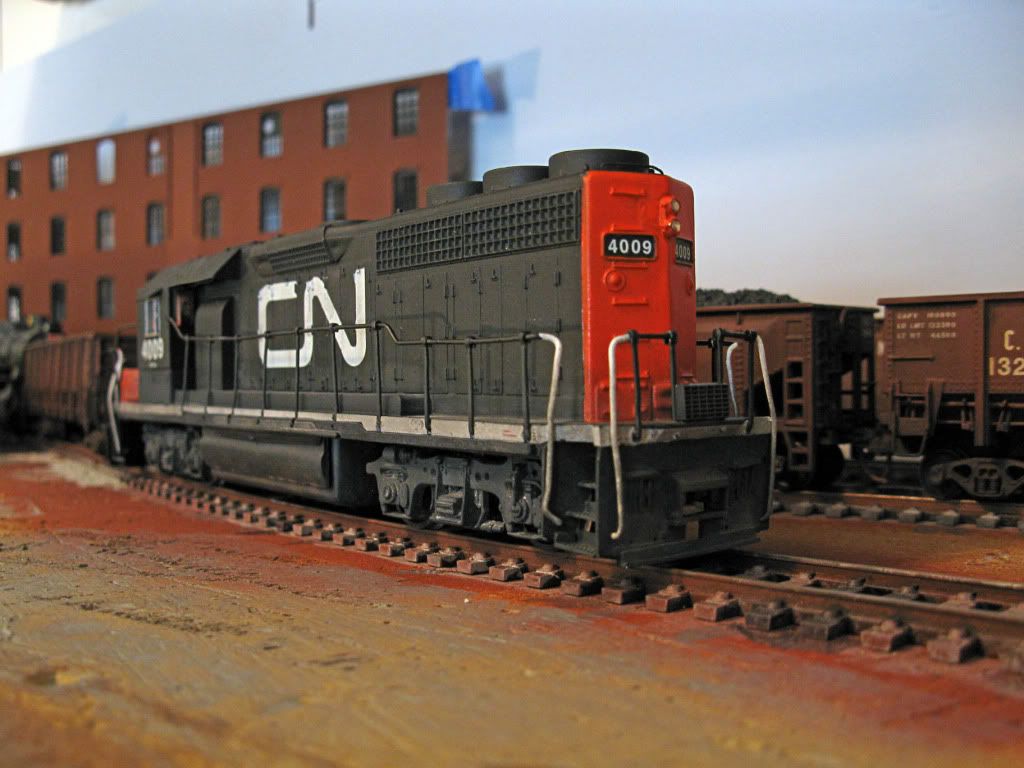
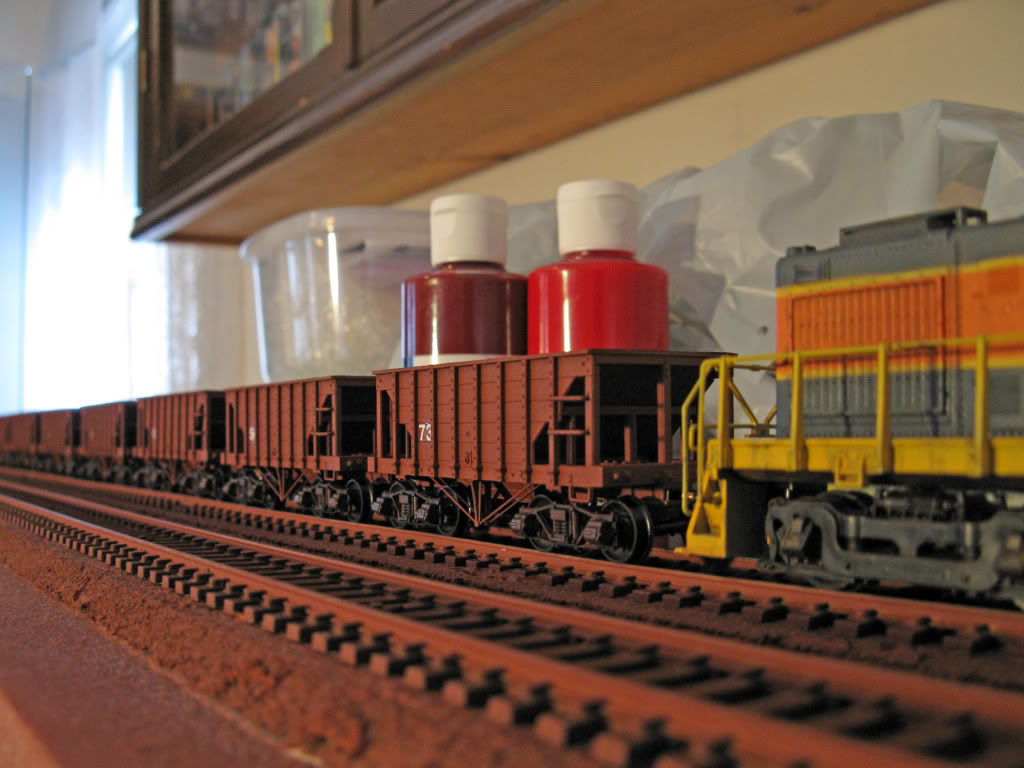
It was fun to find out CN used a pair of GP40-2W to switch the industries. It's been a month since we bought a pair from Atlas. Very nice little engines indeed.

L'Anse-aux-Foulons, east side. Tunnel portal behind concrete abutment.


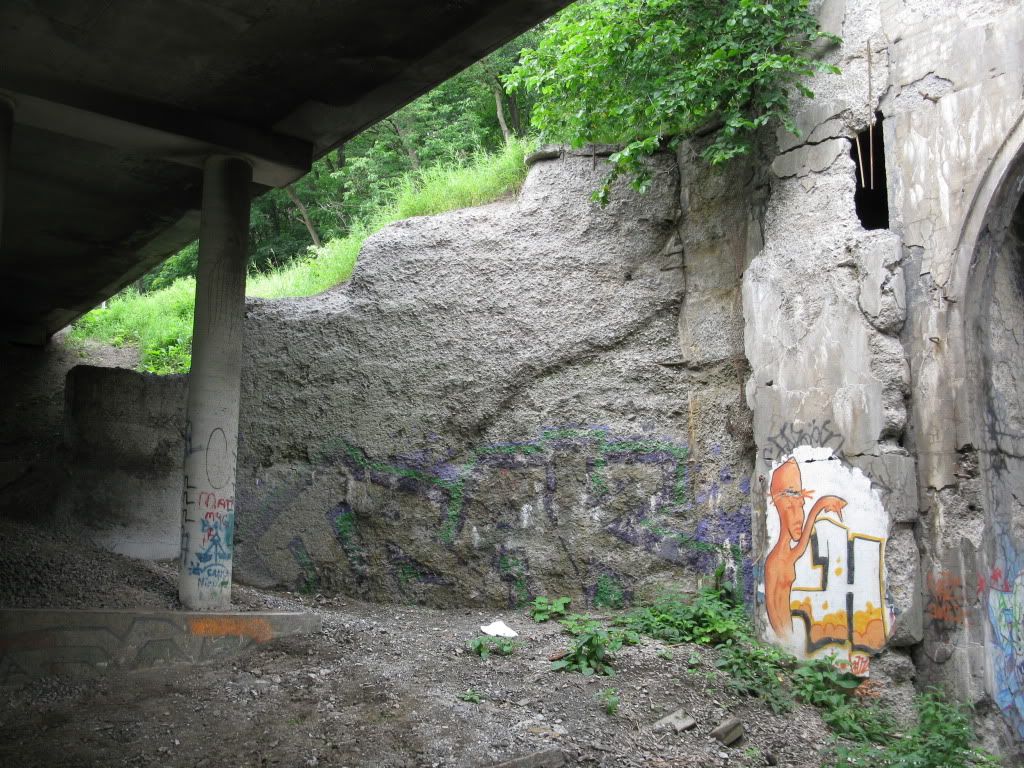
Portal in 2011. Most concrete pilasters and abutments are in bad shape.


 With the help of pictures and actual dimensions, I was able to reproduce the portal in AutoCAD.

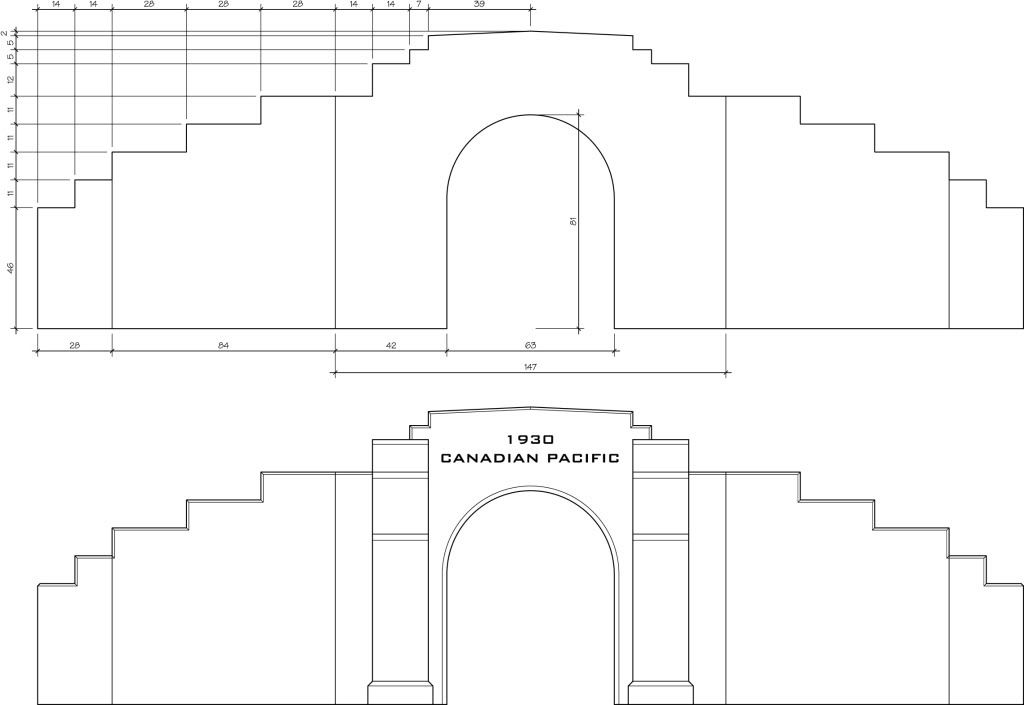
HO scale portal elevations.


I printed the drawing to make a quick mock up. Looks pretty nice to me.


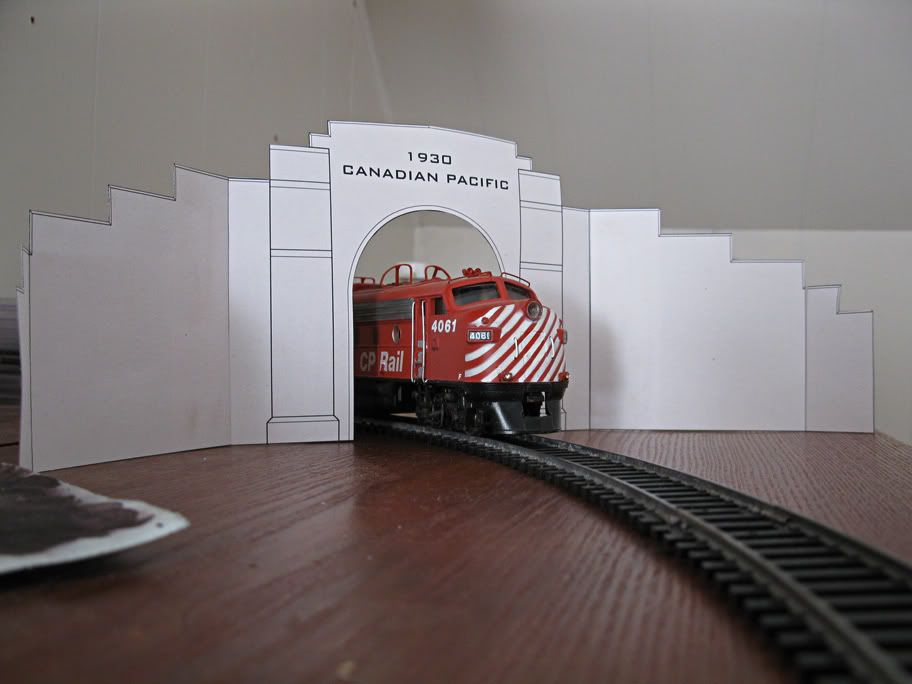
CPR 4061 (Athearn) emerges from the south portal.


The portal will be made out of 1/4" thick masonite with 2mm thick styrene sheets for pilasters.

Wednesday, July 27, 2011

Laying Track at Basin Louise

Work has resumed at Basin Louise. Track laying started a weeks ago and yesterday, we completed the carfloat and yard entrance.

The new Basin Louise extension with the large grain elevator.


Back in the 1970's, Canadian Pacific had plan to use a ferry to move car from Quebec City to Baie-Comeau. They started to build the pier, but stopped before they finished this foolish endeavour. The carfloat on the layout is protofreelanced concept inspired by this. The carfloat will be christened "Leonard", which was the historical name of a carfloat that operated between Quebec City and Levis before Quebec Bridge was completed.


Car float with the yard behind.


Apron and pier.


Gradually, PECO turnouts are making their way on the layout. Atlas are good but since I can get my hand on PECO for the same price, one would be crazy to hesitate. Space is at premium and the yard ladder was made with curved Setrack turnouts. At first, I was a little bit scared, but this tricky and sharp radius section operate without a glitch. Inside radius is a little under 18", however, most 4-axles engines worked their way without problems. Most of the time, this part will be switched with a GE 44-ton, SW, Alco S or small GP.


The new curved yard ladder.


3 PECO curved turnouts make the yard ladder and save a lot of space.


The new yard now enjoy 4 tracks instead of 3. Place was available and a short operation session proven us it wasn't a luxury.

Carfloat and yard. Main line is at right with the GP40-2W.


News from Hedley Junction

Fournier & Papillon building is almost completed and Saul Assh Scrapyard is now housed in a Walthers 2-stall engine house. Maybe this industry will be replaced by something else. Who knows?

The first building is scratchbuilt in styrene according to an Insurance Map.


Canardière Road overpass was completed with slightly kitbashed Rix Products kits. The concrete girder with decorative panels was scratchbuilt from memory according to the prototype. Final painting and weathering not done yet. We will have to rebuild this part of the yard for better operation soon, so the finishing touch will be done after that.

Canardière Road concrete overpass.


Next time we work on Hedley, we will get rid of all 18" radius curves and replace them with at least 22" and higher radius. This decision was made to get smoother operation, visual appealness and to run 6-axles diesel and larger steamer is wanted. We are also replacing, according to our budget and ressources, all #4 turnouts by #6 when possible.

By the way, the club members finally made the decision to move from DC to DCC. It took us 4 years to decide.

Thursday, July 7, 2011

Return to Bassin Louise - Part 2

After a few comments from fellow club members, it was decided to eliminate the yard lead in the port area. We found it useless since the main line could do exactly the same job without operation issues. It is also more respectful of our prototype.

The oil platform was also trimmed to one siding only. The major difference is a new diamond to shuffle cars at the grain elevator. This device eliminated the need for a troublesome double crossover that would have been a nightmare operation with 50' cars.

Revised layout plan


I also worked on Pointe-à-Pizeau. The actual location sports a wonderful gothic church overlooking the St. Lawrence River in the same way as depicted on the layout. It will help to blend the background. I don't expect to crowd the place with a lot of buildings. We will see what we can do when we will build the cape in real life.

Second revision


I decided to eliminate the yard lead completely near the grain elevator. The siding now looks more prototypical with fewer turnouts and lesser track. Also, no more S-curves, which was an important thing I wanted.

Second revision - Third version

Wednesday, July 6, 2011

Return to Bassin Louise - Layout Extension

Funny thing, English royal couple just toured Quebec City last week-end and our layout is back to Princess Louise Basin. What happened?

In fact there's no connection with the British Crown. To put it short, we had a little mixed feelings over the last weeks about the Murray Bay extension proposal. Benchwork had been built and looked promising. The peninsula with a central background work nicely to create two different scenes. There was a consensus among us to keep it. However, the theme and trackage our this extension remained full of question. It was like running a train to nowhere.


Last Monday, we decided to start planning a serious proposal for the extension. Over the last weeks, we already explored ideas about rolling countryside with a farmer's cooperative (mainly inspired by Lyster Station, Quebec) and bringing back the harbour scenes, notably the huge grain elevator and the car float.

I was also personally concerned about providing a mean to return trains and engine. It was decided to build a returning loop. The good thing is that it will need a tunnel and one exist in Quebec City Harbour near Wolfe's Cove (aka L'Anse-aux-Foulons). On the other hand, Lyster Station was also a junction so it will fit perfectly in the setting.

Overall, this new extension proposal will complement nicely our existing industries at Hedley. Also, the idea to have a point-to-point layout with two yards will give enough opportunities to have three people operating at the same time which was lacking on the actual setting.

The New Layout

New layout extension proposal.


Design criterions:

-22" minimal radius (only once in the tunnel), average radius is between 24" and 36"
-#6 Turnouts on mainline and other places were switching can be tricky or 6-axles engines can be used
-No S-curve
-Long sidings with large industries

Typical Train Operation

Imagine a grain train leaving Hedley-Junction. It crosses the furnace tunnel and exit at Lyster Station were it must enter the passing to let pass an eastbound train. Then it exist Lyster and come near St. Lawrence River when it gently run through the peninsula ends. At this point, the train continue, pass the diamond with the diverging route and enter the yard siding. At this point, all cars are left in the siding and the engines continue to the end of the layout were they can stop at the engine house. The staff take a break, a lunch and prepare the engines for the next trip back to Hedley.

Meanwhile, a switcher exit the yard, take the train and bring him back to the yard. Grain cars are then shuffled into the grain elevator and the switcher use the small crossover at left to escape from the siding. A new train is assembled in the yard and put back in the siding. Our original crew put the caboose at the end of the new train, runaround it and finally can head back to Hedley.

Grain elevator cars will be spotted by a motorized cabestan that will move the cars without the need for a locomotive. This kind of device is often seen in this kind of industry.

As you can also see, the switcher can operate in the yard without having to use the mainline. Most industries face the same direction which will eliminate most of the tiresome runaround. Once a while is fun, too much is just a bother.


Now, time to put these idea in the "real" world.

Saturday, July 2, 2011

Improving Bachmann GP40

Since I recently receive my new Atlas GP40-2, I wanted to run her in consist. A few months ago, an old friend of mine whom did some modelrailroading with me as when we were teenagers gave me a box with his original cars and trains. It contained an old metal-truck Athearn GP9 and a rundown Bachmann GP40. The first one runs like a clock as it always did. The second was so bad I don't remember we ever used it on the layout back in the mid-90's. Every details was already broken on it and the motor was worthless.


Original model as received and as I always knew it.


I was a little bit reluctant to kitbash these old models. They are full of memories and remember good times when I first learn to make "real" operation sesson with my friend. However, the Bachmann engine was always an eyesore to both of us, I didn't mind to rebuild it. I even remember asking him to do this back in 1997! This long overdue work had to be done.


The model as it was prior to any work. Even the pilots were destroyed.


I replaced the missing pilots with a set of kitbashed stairs from an old C424 shell from Atlas. Handrails are made out of brass wire and Athearn stanchions. The bell was kitbashed from a brass steamer bell and bits of styrene. Shields were made out of styrene too and others details are remnants from previous superdetailling projects.


The redetailled model.


 Everything was repainted with Krylon black primer and True Line CN Orange and sealed with a coat of Dullcoat. Decals are from various sheets from Microscale.

Rear with new handrails. Marker lights still to be painted in silver.


Weathering was done with a light wash of Citadel Chaos Black acrylic thinned in alcohol and pastel chalks. I tried to not overdo the weathering and to stay close to the original prototype.

Locomotive CN #4009 in 1979, cnrphotos.com (Don Jaworski), 2011

Wednesday, June 29, 2011

Upgrading Trainset Quality Cars

For the last year, I practiced weathering on cheap trainset quality cars. Since the result wasn't half bad and the layout needed an important fleet of gondolas and hoppers, I decided to upgrade all my cheap stuff instead of wasting a large amount of money on cars that wouldn't be prototypical according to canadian standards (CNR). All cars were repainted with Krylon Brown Primer (spray can), relettered using various dry transfer letterings/decals and weathered with highly thinned black washes, oil paints in mineral spirit and pastel chalk. Everything was sealed under a generous coat of Dullcoat.


IHC 40' Quad Hopper

This one started as a cheap IHC President's Choice Christmas Trainset 40' quad hopper. The quality of the cast-on details is far better than one may think at first. Follow the work in progress here.


Bachmann 40' Quad Hopper

A batch of four Bachmann 40' quad hoppers also received the same treatment. However, the cast-on details are a little bit thicker than IHC mold. Follow the work in progress. Follow the work in progress here.


Bachmann 40' Gondola
 
The next try was a major rebuilt of four Bachmann 40' unprototypical gondolas. They have been converted into drop bottom gondolas. They follow accurately a prototype built for CNR back in the 30's and still seen in use at least in the 80's.


Model Power 40' Gondola

The last ones are a set of five Model Power 40' gondolas. Cast-on detail is cheap and brake wheels were replaced by spare parts. The brake details on the underframe are from Accurail.

Thursday, March 31, 2011

Half-Turntable for Hidden Space

Since the day we decided to use steam power for the layout, we had to face a major historic problem... turning our engines. It is impossible to add a turntable to the existing shelf layout because of technical and operational issues.

Until yesterday, it was done manually, by the Hand of God, at the risk and peril of breaking small details. In fact, we almost never turned them.

On last Wednesday club meeting, I told my fellow members it was time to install a new turntable and that the best location for it would be in the furnace closet actually used as a tunnel to join the under construction Murray Bay Subdivision. The idea was welcomed coldly at first, but the spectacular and creative solution that appeared by the end of the night surpassed all our expectations.

The shop district located in the furnace closet.


One have to know Louis-Marie once scratchbuilt a large turntable for our President’s Choice 4-6-4. Operation was unreliable and the roundhouse proved to be a waste of time and energy since it almost never served as much as intended.
The main layout is located on the other side of the tunnel (right corner).


This time, the track plan is the simpliest you could dream of: a single spur with half-a-turntable located on a triangular 2’ x 3’ benchwork. The operation is straight forward: turning locomotives between duties.

Original turntable and roundhouse from the previous layout.


The old scratchbuild 16” (116 scale feet) turnatable from the previous layout was scavenged from the garage and reinstalled (it works with a magnetoscope motor). Since we lacked place and don’t plan to store engine there, the index system has only one position. Also, we further slimmed the turntable by creating an open pit, something I’ve never seen on any layout. We think it gives a really interesting sight for locomotive.

Mock up scenery made with Vollmer roundhouse parts.


A bunch of discarded Vollmer roundhouse facades were added to mock up a “railway shop” looks and the kitbashed Limoilou coal tower found its way back on the layout. To make room for a better scenery, the turntable will be move a few inches more from the wall to install backdrop buildings.

Limoilou coal tower nested in the back corner.

Wednesday, March 23, 2011

Improving Tichy Train Group 22' Ore Cars

Tichy Train Group is a well known company specialized in styrene train car kits. Often, they sell their own stuff on Ebay for a really good price. It’s there that I bought a set of twelve 22’ ore cars last year. The car are very well molded and nicely designed. Building process is straightforward but still quite time consuming (about 45 minutes per car, excluding painting and decalling). Nothing to compare with your usual old Roundhouse and Athearn car kits. I would compare it to Intermountain Railway kits in term of building experience, maybe easier.

Completed cars with original styrene trucks.

On the layout extension is located a rail-served iron mine. We need cars for it and new or second hand ore cars are on the expensive side. I have to concede that wood ore cars would have been long gone in 1957. However, our prototype, the QRL&PCo was recognized for using cars from the late 19th century and early 20th century well into the late 50’s. From what I can tell, iron ore from St-Urbain didn’t go on interchange and was only moved on rail to Quebec City Harbour.

Building was done following Tichy recommandations: painting the part prior to the assembly. I would discourage anybody trying to paint them afterward, it won’t work at all. Parts were sprayed with Krylon Brown primer to represented a generic color like Canadian National Red 11 and construction started.

Cars pulled by an Atlas S-2 switcher.

Trucks were the most consuming step. They are made of multiple parts and nylon “bearings”. Give a special care to make sure everything is well aligned because the rolling performance will suffer from any warping induced when cementing the part.

Once everything was assembled, I sprayed a second coat of Krylon primer to get a nice finish. Lettering was straightforward since i only numbered them to represent cars from a 01-99 serie. Tichy recommands to only number them and I agree. It’s prototypical and you can use them in different era/road without problem. When decals were set,  I sprayed a coat of Testor Dullcoat prior to weathering.  At this point, I drybrushed Krylon primer over the numbers to get a nice washed out effect (you can thin Krylon primer with isopropyl alcohol to some extent).

A string of twelve 22' ore cars prior to weathering.

Weathering was done with washes of PollyScale Steam Power Black diluted with 70% isopropyl alcohol. The alcohol react with Dullcoat and create an interesting whitening that looks right. On some cars, the whitening was too much harsh and full of blotches, I’ll probably overcoat them again with Dullcoat to erase this unwanted effect. Trucks were weathered with a black oil paint and mineral spirit wash to get a greasy look. Black pastel chalk was also brushed over the truck and lower car body to simulate dirt.

First operation session and modifications

Straight of the box, Tichy ore cars are underweighted which is made worst with the light styrene truck and plastic wheel. They run fine, but expect derailment issues is your track isn’t perfect! I decided to install all-metal Kadee archbar trucks on a car, it was optimal. However, my cars are in service in the 1950’s, so Bettendorf trucks would suit them better. At this point, I installed a pair of Accurail Bettendorf trucks with metal wheels. Not good as Kadee all-metal truck, but still an excellent improvement. I’ll probably build loads for these cars, so it is the most realistic and economic way to improve the cars.

Weathered cars: upper car is equipped with Accurail trucks.

Upgrading a Bachmann 40' Quad Hopper

My attempt to convert an IHC 40’ quad hopper into a CNR prototype was quite successful in terms of getting a sturdy car for operation with a fairly convincing paint scheme. Most people just doesn’t know or bother about the fact it should be a triple bay hopper... But let’s skip the rivet-counting on that one.
After this success story, I tried to do the same with my good old 40’ Bachmann CN “wet noodle” quad hopper. A little bit less successful. Details are thicker and Bachmann lettering is completely off the track. The result isn’t half bad, but not fitting the layout era. Then, a friend of our club gave us a box full of Bachmann train sets. Among them, 3 other CN hoppers were waiting a conversion and luckily, I had enough decals on hand to letter this fleet.

CNR Prototype Triple Bay Hopper, cnrphotos.com, Gord Hilderman (2011)

The prototype is a CN set of hoppers built by ECC in 1944 (serie 324500-324999) and in 1948 (serie 325000-325499). These triple bay hoppers were still in service in the 1980’s. When I numbered my IHC quad hopper, I made the mistake to use a number from the 323000 serie, which was built in 1958. The heavy weathering doesn’t suit either a car from the future! I preserved the car data from the Bachmann cars to save some decals (you don’t want to waste good stuff on toy train). The built date is 1948, which is a good approximation for the car I want to reproduce. Also, these cars were originally numbered 110XXX or something like that back in 1957. So, my numbers aren’t good at all for the layout era. However, I don’t mind to much about this... call it the modeller license (in fact, I don’t have enough “1” numbers in the lettering sheet to do all the cars).

Up: Bachmann hopper, Down: Lionel hopper (not original trucks)

How bad is the model? It's bad, real bad... Trucks are plain wrong, details seem to have been sculpted with a potato peeling knife and... there's hope. But you have to face the fact, Bachmann tooling is worst than IHC. It's worst than a HO Lionel car and I'm talking about the crap they issued under their name back in the 60's. Anyway, modeler's life is all about bring the best from the worst pieces of crap sold by unscrupulous manufacturers.


Up: Lionel with well defined grab irons, Down: Bachmann "low profile" details.

Conversion started with removing the ugly Bachmann talgo trucks. Since these cars were made in the 1990’s, isn’t not the cheap snap trucks from the past, but screw-mounted trucks. I’ll reuse the screw. Then, the underframe was filed flat and shimmed with  1.5 styrene sheet to accommodate a Kadee coupler box.

Underframe modified to accept Kadee couple box.

Bachmann truck pivots are quite large, so I trimmed them with an X-Acto until an Accurail Bettendorf truck could swivel freely. This complete the physical modifications to upgrade the rolling quality of a Bachmann car, quite simple. I like it that way.

Large original truck pivot.
Trimmed truck pivot to fit Accurail trucks.
Most factory-painted lettering was removed – excluding the car data – with 95% rubbing alcohol. Bachmann lettering is made of a cheap white gloss paint that peel off easily with alcohol. No need to soak the car, the paint lift up after a few seconds and you can rub it off with a paper towel soaked with alcohol.

Lettering removing process with 95% rubbing alcohol.

Previously weathered car is stripped from its lettering.
Car data was masked with painter masking tape and the hoppers received a coat of Krylon Brown primer. This color match almost exactly CNR Red 11 and there’s almost no difference with the original Bachmann color. This primer is my favourite color for CNR cars. Cost and time efficient and can be turn into many different shade when weathered properly. Trucks were also primed brown as CNR practice from the old days.

Hoppers primed with Krylon spray can, car data preserved.

Learning from past mistakes, I brushed a diluted coat of Future (Pledge) acrylic floor finish before applying the decals. Decals come from a CN “wet noodle” sheet published by Microscale for car from the 1960’s to the 1990’s. This sheet is quite strange. First of all, I’ve never seen the blue wet noodle logo on any car, even mechanical reefers. Call this an artistic license or a rip off. My LHS, Microscale and people wandering on Internet never answered my question. Honestly, if anyone knows what car used this lettering, let me know: I’ll build a fleet of them with the remaining decals in my drawers! Anyway, this sheet have a strange looking set of “Canadian National” written in a odd block (gothic) font with assorted reporting marks. Again, I have no idea where they come from, but with no real use for them, they can be an acceptable stand-in for older cars. CNR triple bay hoppers seems to be lettered with a font very similar to Century Gothic (a truly classic font often used by railway during the 40’s and 50’s).

CN Freight decals sheet, Microscale.com, 2011

“Canadian National” letters had to be separated to get the exact spacing shown on the prototype. This step is very time consuming has you can guess. It also gives concern about letter alignment, but one get used to it after a few tries. To accelerate the decaling process, I work according to a production chain: all cars receive their lettering in this very order: “Canadian”, then “National”, then “C.N.” and finally the car number. To keep oneself minded, I think it is essential to set small goals to achieve. This way, the task is easier to handle and successfully completing small objectives gives you a feeling of going somewhere.

I use a ruler to check out letters alignment.
Lettering completed (except number).
Completed cars compared with IHC hopper (upper).

When the lettering process is finish, each car received a coat of Testor Dullcote (1260) flat varnish. It seals the decals and give a nice flat finish that hold well the weathering powders.

Weathering is done by airbrushing several highly diluted coat of Citadel Chaos Black (in 70% isopropyl alcohol). Masks are used to simulate renumbering and repainting jobs done by the railway. I spray a final coat of Dullcote to get rid of unwanted whitening effects caused by alcohol reacting with the flat finish.

Finished car with weathering

Oil paint and mineral spirit is used to highly some details and get running rust effect. They are effective to weather trucks and make them look greasy. Pastel chalk is finally applied to dust and build up dirt spot on the lower car body and trucks.

And now, they are ready to be put in revenue and receive their coal loads.